Why is At-Home Waxing Your Best Bet for Smooth Legs in 2026?

Why at-home waxing is the smarter choice for smooth legs in 2026
Want silky, salon-grade legs without weekly shaving or surprise stubble? At-home leg waxing gives you longer-lasting results, better texture, and more control — especially with the smarter kits and vegan formulas available in 2026.
Before vs. after: shaving vs. waxing
- Shaving typically lasts 1–3 weeks; waxing can keep skin smooth for up to six weeks. That gap changes your routine, reduces razor irritation, and often improves skin texture over time.
What makes at-home leg waxing worth learning now
- Cost efficiency: fewer products and less frequent sessions than shaving.
- Flexibility: do legs on your schedule (weekends, travel, or pre-event prep).
- Product evolution: modern heated systems, gentle sugar waxes, and pre/post-wax care products reduce discomfort and irritation.
A simple 3-step framework I use and teach: PREP • PULL • PROTECT
- PREP: Hair should be ¼ to ½ inch. Exfoliate 24–48 hours before and cleanse with a pre-wax cleanser so wax adheres.
- PULL: Warm wax correctly, apply with hair growth, remove against growth while keeping skin taut. Use sugar wax if you prefer a gentler, water-soluble option.
- PROTECT: Cool compress, soothing post-depilatory gel, and avoid sun, heat, strenuous exercise, and fragranced products for 24–48 hours.
Bold rule: consistent exfoliation prevents ingrowns — exfoliate again starting 2–3 days after waxing, 2–3× weekly.
If you want professional backup or prefer a hybrid plan, Amsterdam Beauty Clinic offers expert services and guidance that pair well with your at-home routine — see their page on waxing. For a deeper how-to on keeping results longer, read our guide to lasting smoothness.
Learning at-home leg waxing in 2026 is an investment: fewer sessions, smoother skin, and better confidence. Master the basics, respect post-care, and you’ll get salon-calibre results at home.
What Do You Need to Prepare for a Perfect At-Home Leg Wax?
Quick reality check before you heat the pot
If you want salon-smooth legs at home, preparation is where you win or lose. I’ve worked with clients who treat waxing like a last-minute chore — and they get patchy results, irritation, and missed hairs. Preparing properly cuts pain, improves adhesion, and reduces ingrown hairs.
Use the PREP framework for flawless prep
- Pick your kit: Choose a leg waxing kit that matches your comfort and skill level—hard wax or sugar for sensitive skin, soft wax if you prefer faster coverage. A complete kit should include a wax warmer (or microwave-ready pots), applicator spatulas, fabric strips (for soft wax), a pre-wax cleanser or oil, post-wax soothing gel, and an exfoliant. For natural, gentler options consider sugar wax formulas; they’re water-soluble and easier to clean.
- Right hair length: Leg hair should be about 1/4 to 1/2 inch long for effective adhesion. If it’s shorter, wait a week; if longer, trim slightly—don’t shave. This length is the sweet spot for pulling root-to-tail and getting up to six weeks of smoothness (significantly longer than shaving).
- Exfoliate & cleanse: Gently exfoliate 24–48 hours before waxing to remove dead skin and free trapped hairs. On the day, use a pre-wax cleanser to remove lotions, deodorants, and oils—wash and pat completely dry. Lotions and oils prevent wax from sticking properly.
- Position & final checks: Set up near a mirror, have a timer, and wear loose clothing. Test wax temperature on your wrist. Keep a small bowl of cool water or a cool compress ready for immediate soothing if needed.
A good kit plus correct prep is 70% of a pain-minimized, effective wax.
Quick product and safety notes
Choose formulas labeled vegan or gentle if you have sensitive skin—we recommend following the same product standards we use at Amsterdam Beauty Clinic for minimal irritation and better results. Learn more about our professional approach to waxing and other services here: waxing.
Exfoliate 24–48 hours before your session, clean and fully dry skin on the day, and ensure hair is 1/4–1/2 inch long. Do these four steps and your at home waxing tips will actually work.
In short: assemble the right leg waxing kit, hit the correct hair length, exfoliate and cleanse properly, then position and test. You’ll be set for a cleaner pull and smoother recovery.
How Do You Master the Art of At-Home Leg Waxing, Step-by-Step?

Want salon-smooth legs at home without the guesswork? Follow this precise, numbered routine to master both hard and soft leg waxing—whether you’re doing a full leg wax or a half leg wax. These are actionable at home waxing tips I use when training clients and recommending products at Amsterdam Beauty Clinic.
Quick pre-wax rules
- Ensure hair is about 1/4 to 1/2 inch long (the sweet spot for wax grip and less breakage).
- Exfoliate 24–48 hours before waxing and cleanse skin with a pre-wax cleanser; skin must be dry and free of oils or lotions.
- Patch-test temperature and product on a small area to avoid burns or allergies.
- Expect smooth results that can last up to six weeks—much longer than shaving.
Small checklist: correct hair length, dry clean skin, and a safe temperature test.
Step-by-step waxing technique (full leg wax or half leg wax)
- Warm the wax to manufacturer’s recommended temperature. For soft wax use a heating pot; hard wax often comes in beads or blocks and should be pliable but not hot.
- Divide the leg into sections: lower leg, knee, upper leg. Work small areas for control—knees and ankles need smaller beads/strips.
- Apply wax in the direction of hair growth using a spatula. For soft wax, lay a strip over the wax and rub once to bond. For hard wax, apply a thicker bead and let it set until matte and firm.
- Hold skin taut with your free hand—this is critical to reduce pain and prevent tearing.
- Remove quickly and parallel to the skin in the opposite direction of hair growth. For soft wax, pull the strip close and low; for hard wax, flick and peel when it’s set.
- Immediately press the area to calm nerves and reduce redness.
- Clean residue: use a post-wax oil for soft wax or water for sugar wax. Avoid rubbing or aggressive scrubbing on newly waxed skin.
Bold rule: always keep the skin taut and remove the wax quickly—speed plus support equals less pain.
Micro-summary: Warm, apply with the grain, hold taut, and pull against the grain—repeat in small sections.
Post-wax care
- Soothe with a cool compress or post-depilatory gel and wear loose, natural-fiber clothing.
- Avoid sun, hot baths, saunas, strenuous exercise, and fragranced products for 24–48 hours.
- Begin gentle exfoliation 2–3 days after waxing and continue 2–3 times weekly to prevent ingrown hairs.
If you want professional follow-up or product recommendations, Amsterdam Beauty Clinic recommends checking resources for best waxing Amsterdam to complement your at-home waxing technique.
Final micro-summary: Preparation, precise application, confident removal, and cautious aftercare are the four pillars of safe, effective at-home waxing.
Can Sugar Waxing Offer a Gentler Path to Silky Smooth Legs?
If you’ve felt wary of hot, sticky resins but still want weeks-long smoothness, sugar waxing deserves a close look. As a clinician at Amsterdam Beauty Clinic, I’ve watched clients swap traditional formulas for a simple paste of sugar, lemon, and water—and notice less redness, easier cleanup, and gentler results.
Sugar wax for legs uses a water-soluble paste that adheres more to the hair than the skin, which means less trauma and fewer snapped hairs. It also doubles as a mild exfoliant, removing dead skin as it lifts hair—so it’s a true natural hair removal option with built-in skin benefits.
Sugar waxing is easier on the skin and easier to clean up—no solvents, no residue.
Old vs new: traditional waxes (resin- or polymer-based) bond tightly to skin and often require oil-based removers; sugar is rinsed away with water. That difference translates to lower irritation and a better at home waxing experience for many people.
Practical notes:
- Ideal hair length: about ¼ to ½ inch for best results.
- Technique: apply paste against hair growth, then remove in the direction of growth while keeping skin taut.
- Aftercare: avoid sun, hot baths, and strenuous activity for 24–48 hours; begin gentle exfoliation 2–3 days after to prevent ingrowns.
For clinic-grade guidance and natural product options, explore our waxing services at Amsterdam Beauty Clinic—our approach blends advanced techniques with vegan, skin-friendly formulations.
Sugar waxing can be a genuinely gentler route to silky legs when you match technique, prep, and aftercare to the method.
What Are the Golden Rules for Post-Wax Care and Lasting Smoothness?
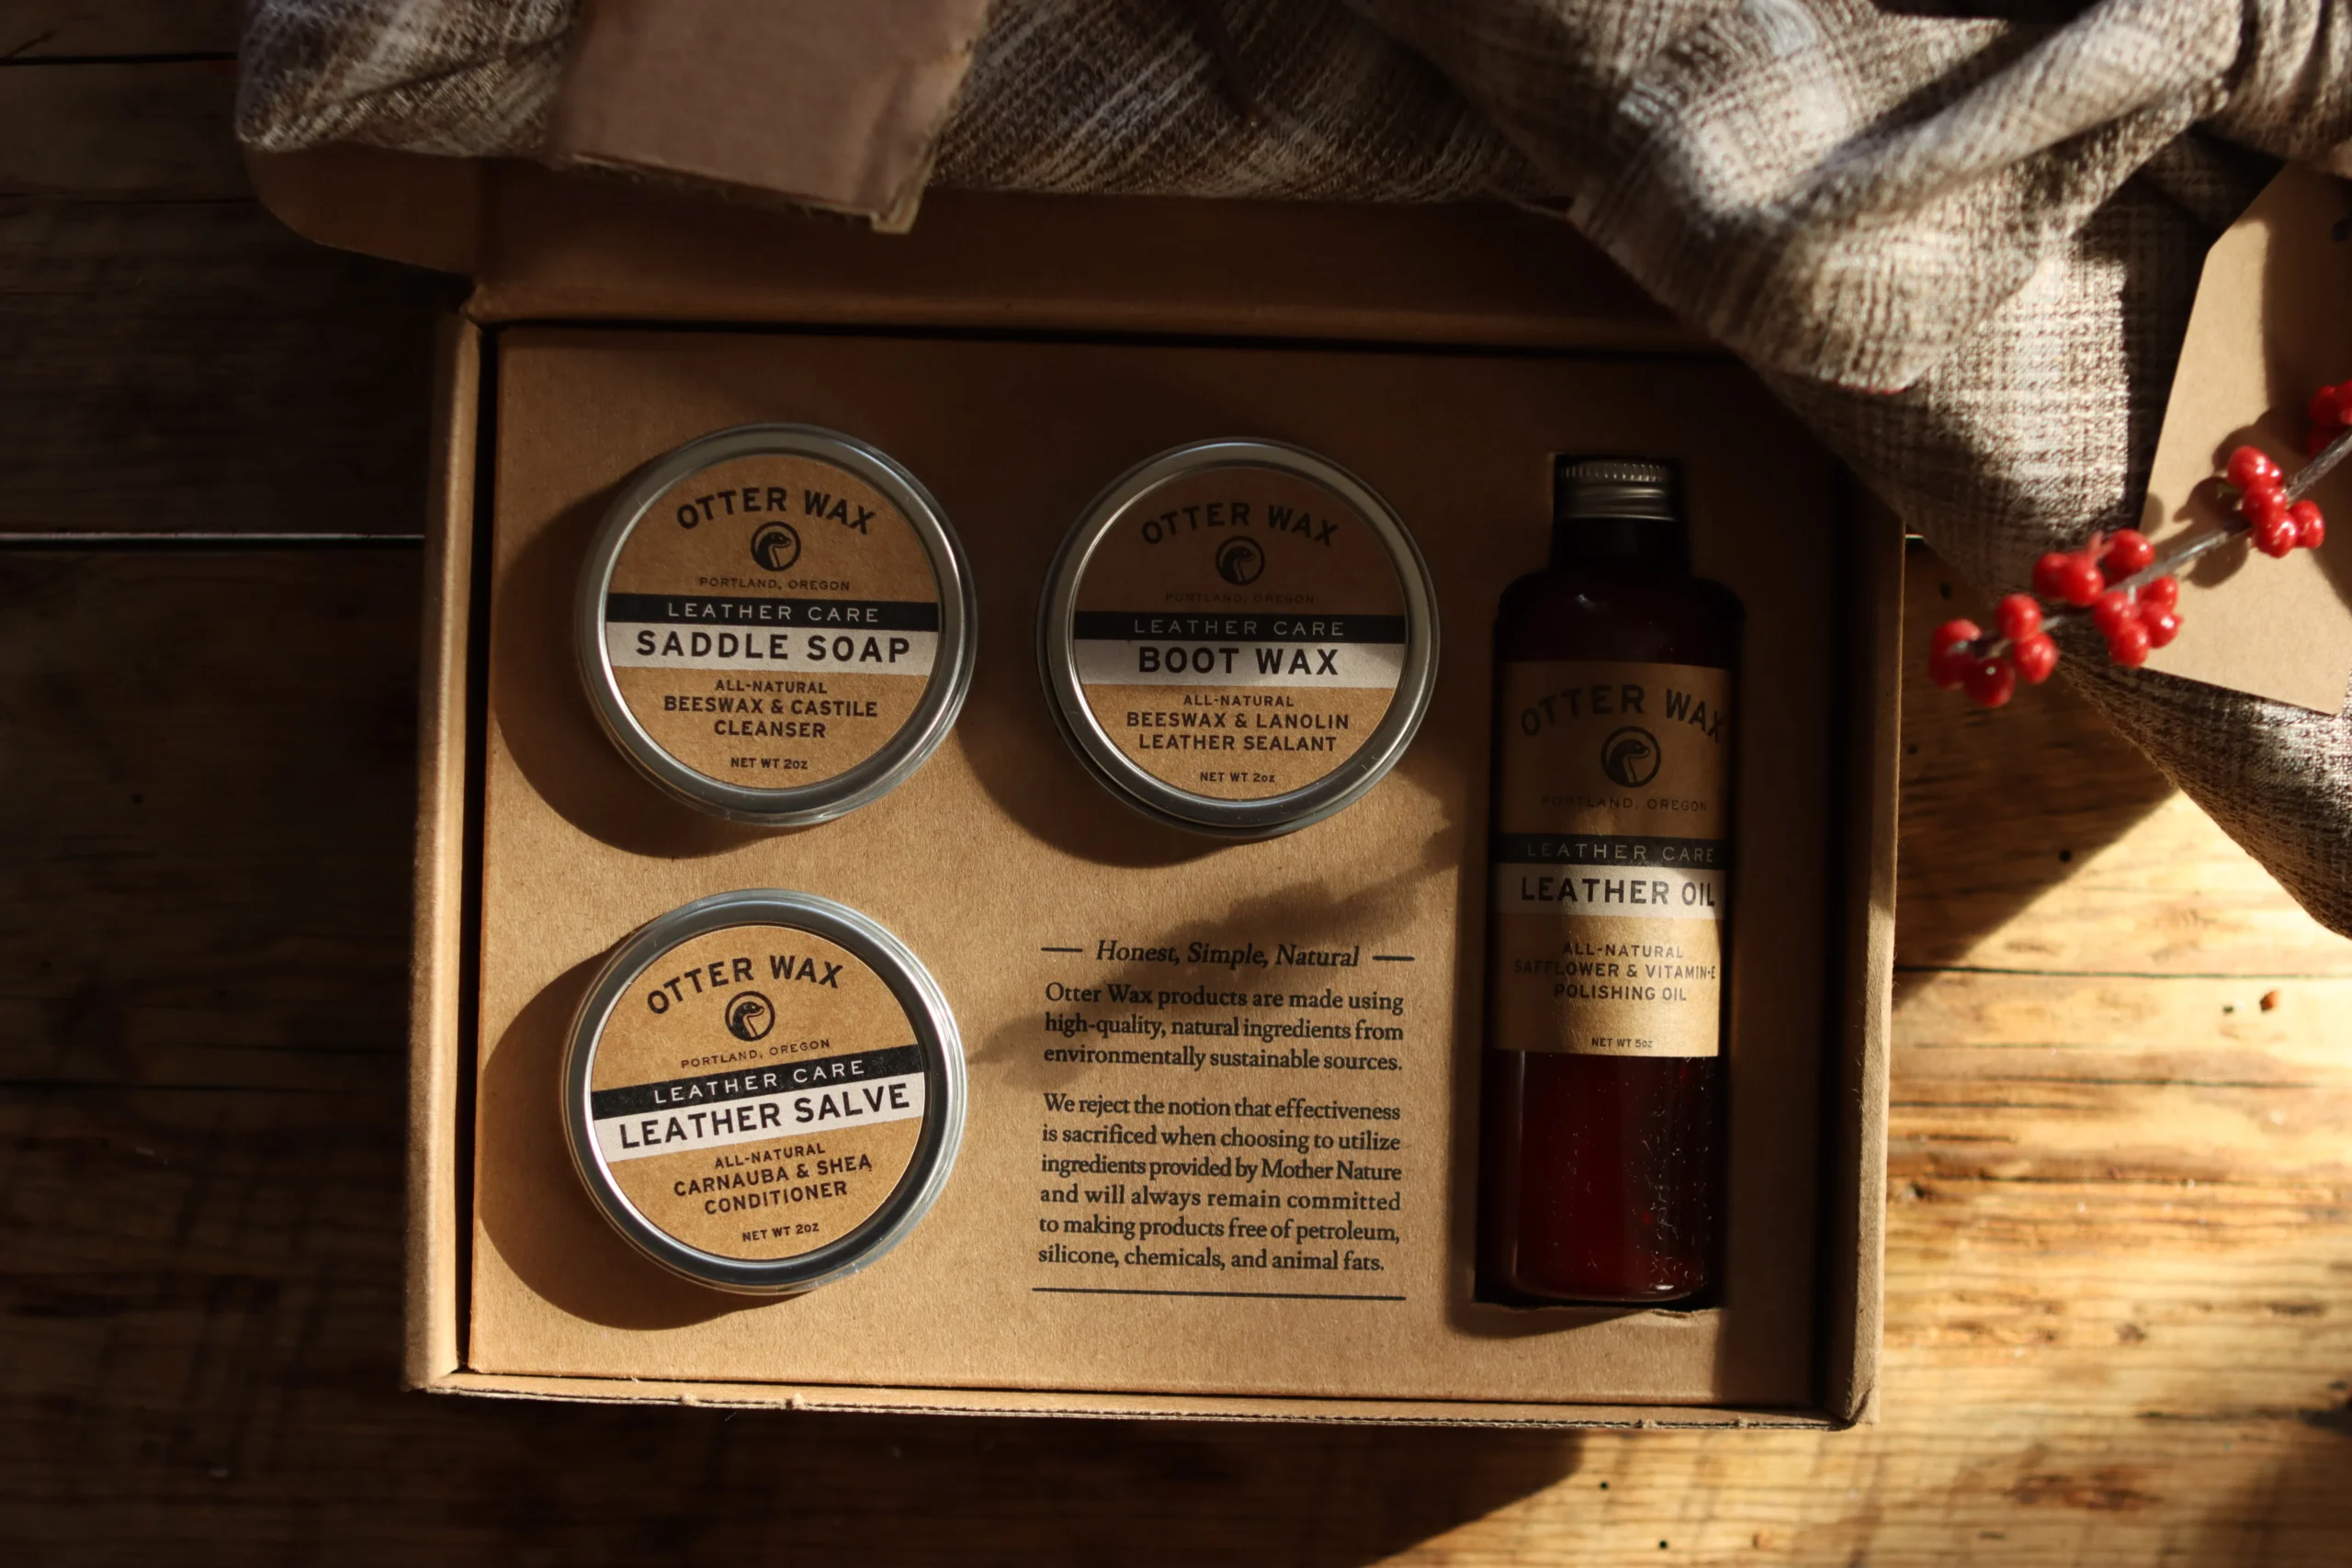
Photo by Daniel & Hannah Snipes on Pexels
Freshly waxed legs look and feel amazing — but the real test is the next 48–72 hours. Small mistakes here turn smooth legs into irritation, bumps, or ingrown hairs. Follow these golden rules to protect results that can last up to six weeks (compared with shaving’s 1–3 weeks) and keep skin calm and clear.
The SSHM framework: Soothe • Shield • Hydrate • Maintain
- Soothe: Immediately after waxing use a cool compress or a gentle post-depilatory gel to calm inflammation. Avoid scented or alcohol-based products for at least 24–48 hours.
- Shield: Keep skin out of direct sun, hot baths, saunas, swimming pools, and heavy exercise for 24–48 hours — your skin’s barrier is temporarily compromised. Wear loose clothing in natural fabrics to reduce friction.
- Hydrate: Begin light moisturizing a couple of days after waxing. Use non-comedogenic, fragrance-free lotions or gels with soothing ingredients (aloe, panthenol). Daily hydration prolongs smoothness and reduces flaking.
- Maintain: Prevent ingrown hairs with a disciplined exfoliation routine. Exfoliate 24–48 hours before waxing and then 2–3 times weekly starting 2–3 days after waxing. Rotate gentle physical scrubs with a weekly chemical exfoliant (a salicylic acid product) once the skin has settled.
Don’t pick, scratch, or tweeze raised hairs — that’s how ingrown hair and scarring start. For stubborn bumps, avoid aggressive home remedies; opt for a professional consult.
Micro-summary: Calm skin, protect it from heat and sun, hydrate regularly, and commit to gentle exfoliation to prevent ingrown hairs and extend smooth results.
If you want professional-level aftercare or alternative methods like sugar waxing or laser options, Amsterdam Beauty Clinic’s waxing services combine state-of-the-art techniques and vegan products to keep your legs silky and healthy. These are my go-to post-wax care principles — simple, repeatable, and effective for lasting smoothness.
How Can You Troubleshoot Common At-Home Waxing Woes?
Quick diagnostic: why a wax job went sideways
Ever had wax that wouldn’t stick, or skin that flared up afterward? Those are the most common waxing problems—and almost always fixable with the right checks. Start by isolating the symptom (adhesion vs irritation vs leftover wax) and follow a targeted fix.
Troubleshooting checklist (fast, repeatable)
-
Wax not adhering
- Cause: skin too oily, hair too short (< 1/4 inch), or wax not hot enough.
- Fix: cleanse with a pre-wax cleanser, wait until skin is dry, and ensure hair is 1/4–1/2 inch long. Rewarm the wax to manufacturer temperature and test on a small area.
-
Leftover wax or sticky residue
- Cause: old or over-cooled wax, or using the wrong remover.
- Fix: use a water-soluble sugar wax or apply a dedicated post-wax oil/mineral oil to dissolve residue. Avoid scrubbing—press cloths with warm water to soften before removal.
-
Immediate redness, bumps, or heat (mild skin irritation)
- Fix: apply a cool compress, then a soothing gel (aloe vera or a post-depilatory product). Cool first, treat second—temperature control reduces inflammation. Avoid hot baths and exercise for 24–48 hours.
-
Persistent bumps or ingrown hairs
- Fix: resist picking. Start gentle exfoliation 2–3 days after waxing and continue 2–3× weekly to prevent ingrown hairs. Use a chemical exfoliant (BHA) if appropriate and spot-treat with a tea-tree or salicylic-acid product.
-
Allergic reaction, bleeding, or severe pain
- Action: stop immediately and consult a clinician. For infections or severe reactions seek medical attention.
When to book a pro
If problems recur despite correct technique, consider a clinic consult—professionals can identify skin-sensitivity issues and offer alternatives like laser hair removal. For expert in-clinic care and gentle, vegan post-wax products, see Amsterdam Beauty Clinic’s waxing services: waxing.
Small prevention steps (hair length, proper cleansing, cool-down) solve most waxing woes. Troubleshoot quickly, treat gently, and escalate when signs point beyond routine skin irritation.
Are You Ready to Embrace Your Confidently Smooth Legs?
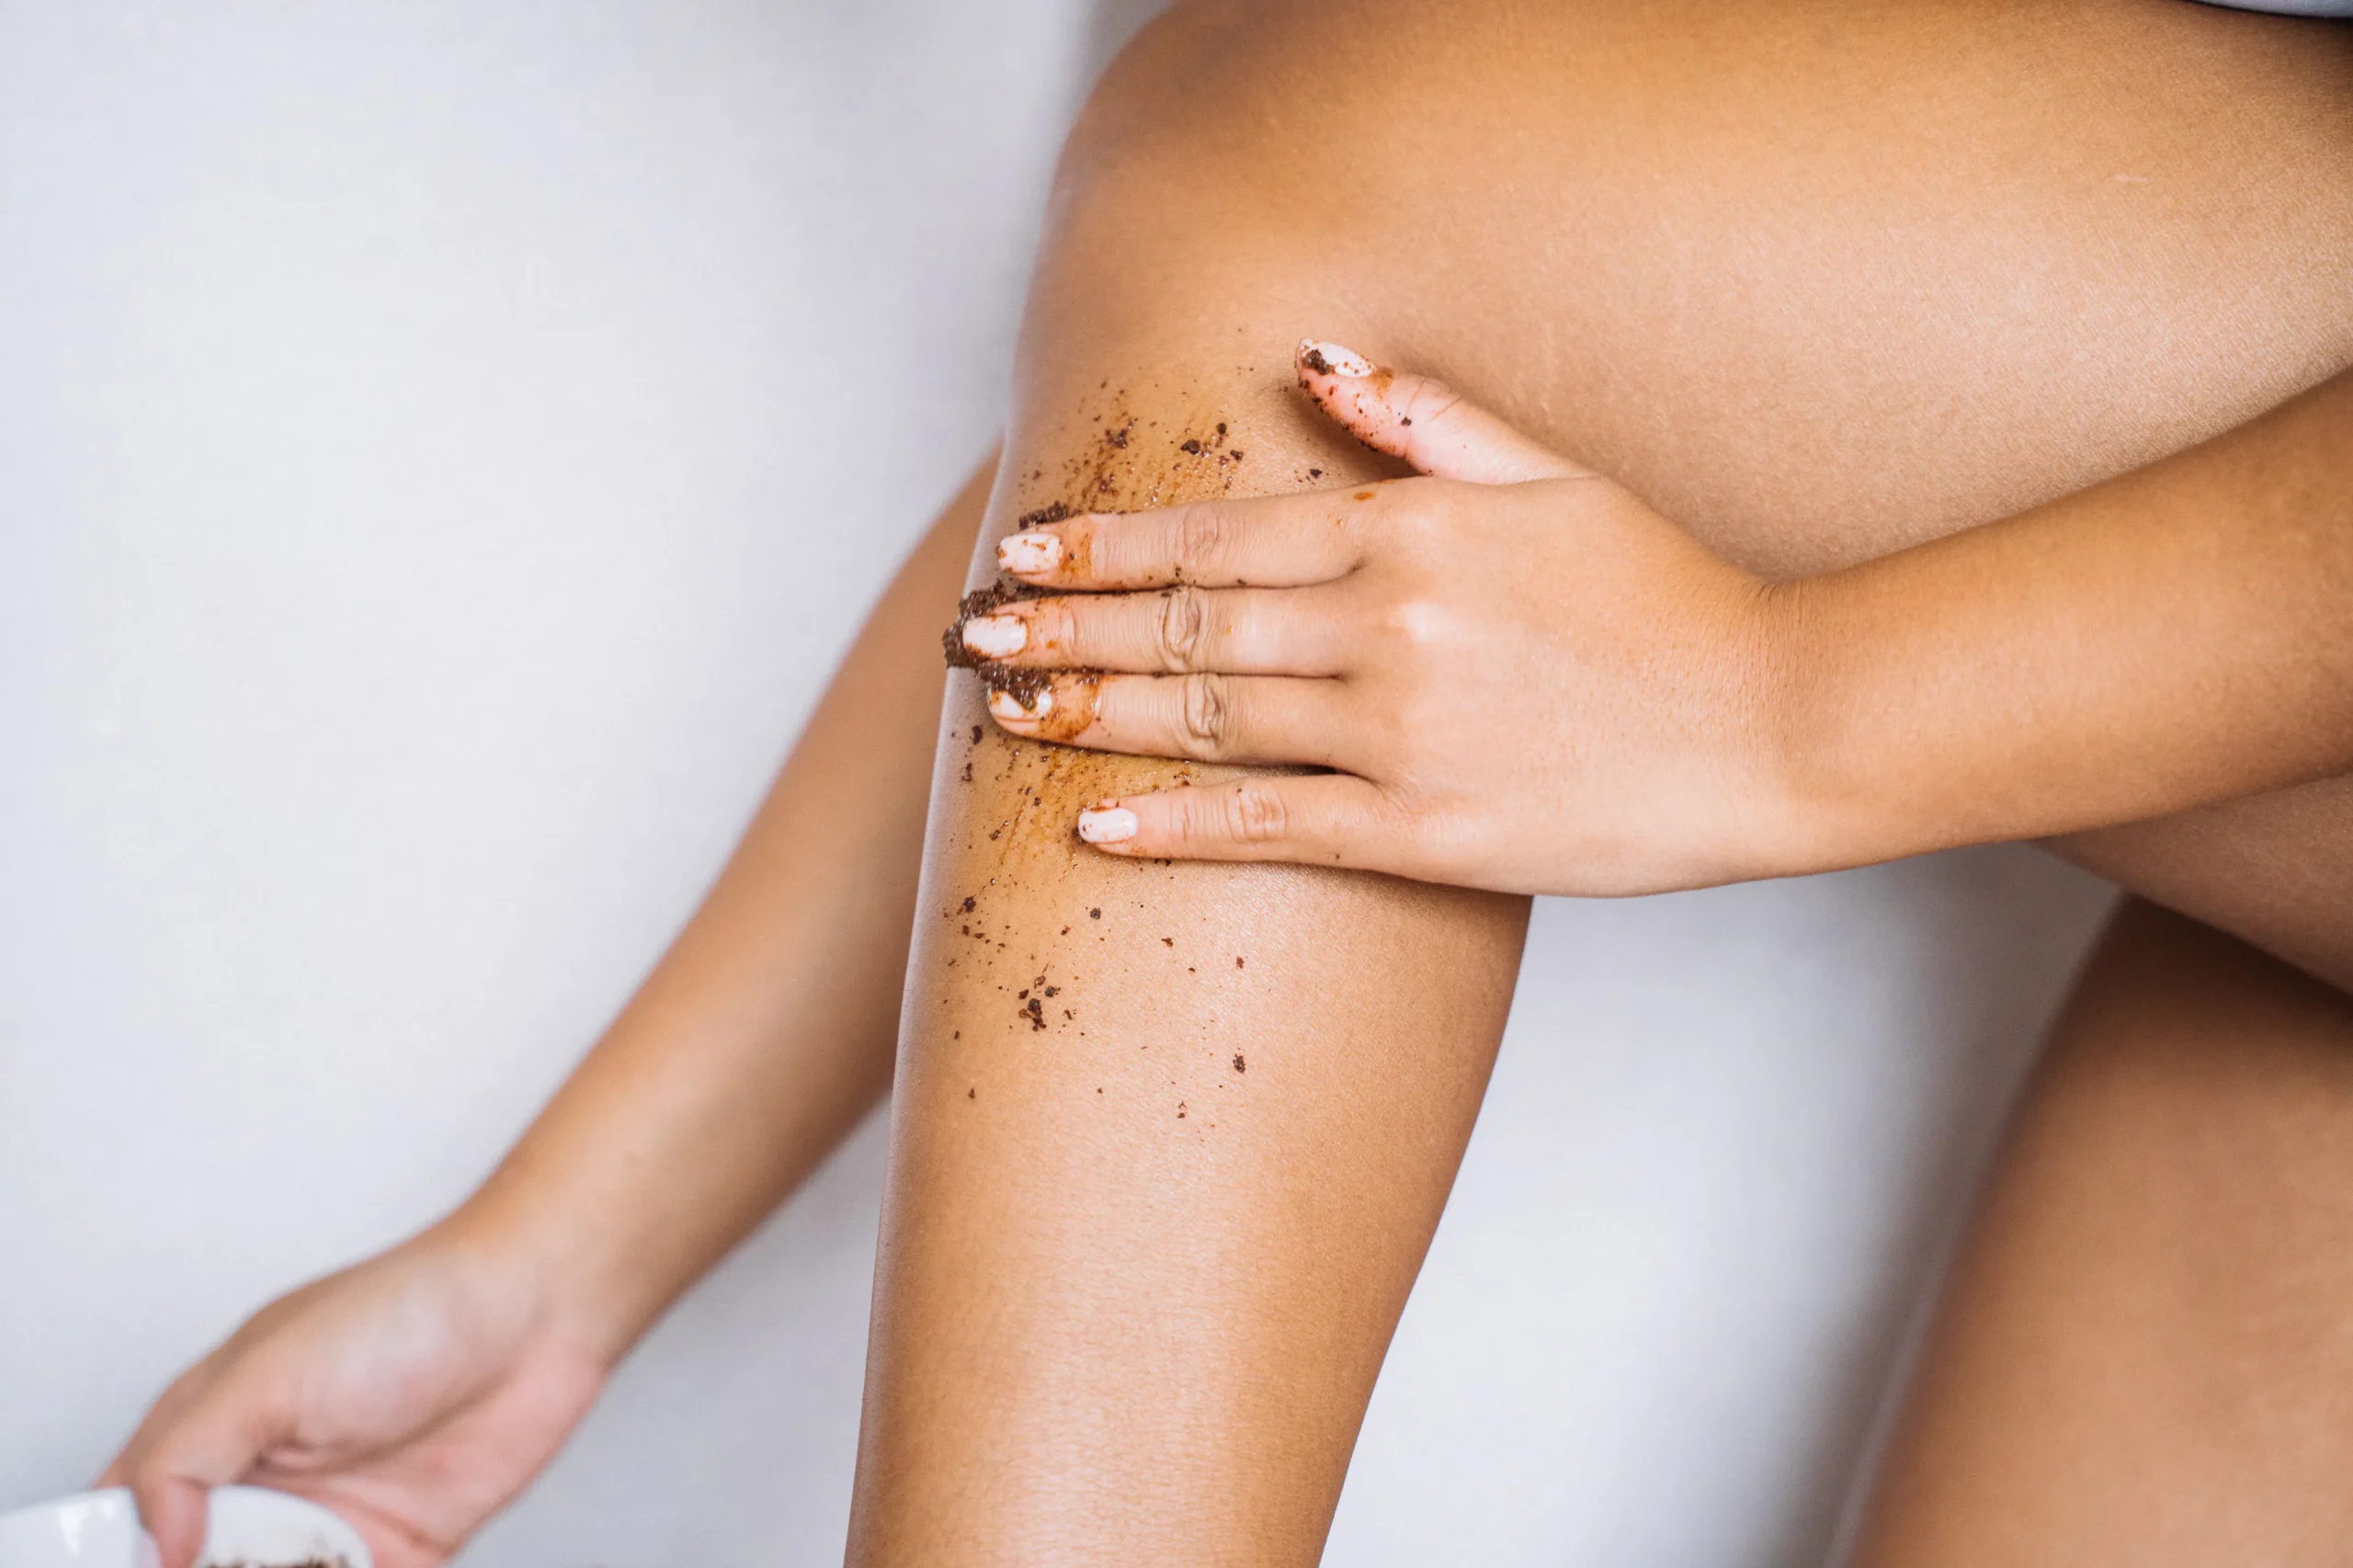
Photo by Anna Tarazevich on Pexels
Imagine stepping out with legs that stay touchably smooth for up to six weeks — not the 1–3 weeks shaving buys you. That’s the real payoff of consistent at-home waxing: longer-lasting texture, fewer maintenance sessions, and progressively finer regrowth that delivers truly silky legs over time.
Start with the basics I’ve emphasized throughout: PREP, PULL, PROTECT. Ensure hair is about ¼–½ inch, exfoliate 24–48 hours before, cleanse and dry the skin, then warm and apply wax with purpose. Remove against hair growth while keeping the skin taut, soothe immediately, and avoid sun, heat, heavy exercise, and fragranced products for 24–48 hours.
Consistent aftercare is the multiplier — exfoliate 2–3 times weekly beginning 2–3 days post-wax to prevent ingrowns and preserve leg waxing results. Consider sugar waxing if you want a gentler, natural option that doubles as exfoliation and cleans up with water.
Consistent technique plus smart aftercare turns sporadic smoothness into reliable confidence.
If you want pro-level backup or faster progress, Amsterdam Beauty Clinic offers advanced, minimally discomforting options and a suite of services that complement home routines — including professional waxing and laser solutions — worth exploring if you seek long-term reduction.
You’ve learned the steps, timing, and care that produce smooth legs. Practice them deliberately, track your hair cycle, and you’ll reliably move from temporary fixes to confidently smooth, silky legs that last.
Ready for consistently smooth, silky legs? Discover expert treatments and personalized advice at Amsterdam Beauty Clinic to complement your at-home routine.
People Also Ask About At-Home Leg Waxing
How long do legs stay smooth after waxing compared to shaving?
Waxing typically keeps legs smooth for up to six weeks, significantly longer than shaving, which usually lasts only 1-3 weeks. This makes waxing a more efficient option for maintaining smooth skin over time.
What is the ideal hair length for effective at-home leg waxing?
For the best results, your leg hair should be approximately ¼ to ½ inch long. If the hair is too short, the wax may not grip it effectively, and if it’s too long, it can make the waxing process more painful.
What are the key steps for preparing the skin before at-home leg waxing?
Before waxing, ensure your legs are clean and completely dry. Gently exfoliate the skin 24-48 hours prior to remove dead skin cells. Avoid applying lotions or oils, as they can interfere with wax adhesion.
How should I care for my skin after waxing my legs?
After waxing, soothe your skin with a cool compress or a calming post-depilatory product. Wear loose clothing and avoid sun exposure, hot baths, and strenuous activity for at least 24-48 hours. Moisturize daily, starting a couple of days after waxing, to keep skin hydrated and prevent dryness.
Is sugar waxing a good alternative for leg hair removal?
Yes, sugar waxing is a gentle and natural alternative for leg hair removal. Made from sugar, lemon, and water, it’s water-soluble, easier to clean up, and often considered less painful than traditional waxes, while also providing exfoliation.
How can I prevent ingrown hairs after waxing my legs?
Preventing ingrown hairs involves consistent exfoliation. Exfoliate 24-48 hours before waxing, and then continue to exfoliate 2-3 times a week starting a few days after waxing. Keeping the skin moisturized also helps.